How to Maintain Insulated Siding
- Supra Home Student
- 2025 January 05T15:13
- Home Improvement
How to maintain insulated siding is crucial for extending its lifespan and preserving your home’s curb appeal. This guide delves into the specifics of caring for various insulated siding materials, from vinyl to fiber cement, outlining cleaning techniques, repair methods, and preventative measures to protect against moisture damage. We’ll cover everything from regular inspections to seasonal maintenance, ensuring your siding remains a durable and attractive feature of your home for years to come.
Understanding the unique properties of different insulated siding materials is the first step. Vinyl siding, known for its low maintenance, requires different care than the more durable, but potentially more demanding, fiber cement. This guide will equip you with the knowledge to properly maintain your specific siding, regardless of material, helping you avoid costly repairs and premature replacement.
Understanding Insulated Siding Materials
Choosing the right insulated siding material is crucial for both the aesthetic appeal and long-term performance of your home. Different materials offer varying levels of insulation, durability, and maintenance requirements. Understanding these differences will help you make an informed decision. This section will explore the common types of insulated siding, highlighting their advantages and disadvantages in terms of maintenance.
Insulated Vinyl Siding
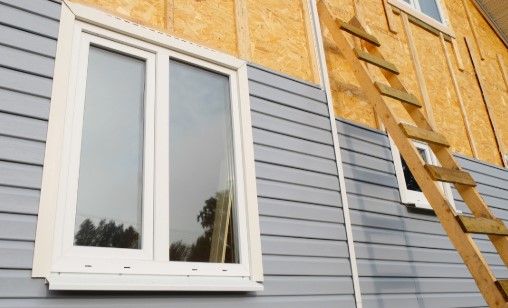
Vinyl siding, often incorporating a foam backing for insulation, is a popular choice due to its affordability and low maintenance. Its smooth surface resists dirt and grime, making cleaning relatively straightforward. However, vinyl can be susceptible to damage from impacts, and severe impacts may cause cracking or discoloration that requires section replacement. While generally durable, extreme temperature fluctuations can cause expansion and contraction, potentially leading to warping or loosening over time. Regular inspection for loose panels or damage is advisable.
Insulated Fiber Cement Siding
Fiber cement siding, often featuring a composite of cement, cellulose fibers, and other additives, provides superior durability and fire resistance compared to vinyl. Its robust nature makes it resistant to impacts, rot, and insect infestation. Maintenance is relatively minimal, primarily involving occasional cleaning to remove dirt and algae. However, fiber cement siding is heavier than vinyl and requires more professional installation. Its higher initial cost is offset by its longer lifespan and reduced need for repairs. Proper sealing of joints is important to prevent moisture intrusion.
Foam-Backed Siding
Various siding materials can be paired with foam backing to enhance insulation. This approach improves energy efficiency and can reduce heating and cooling costs. The foam backing itself is generally low-maintenance, but the type of siding material on the exterior (e.g., vinyl, wood, metal) dictates the maintenance requirements. For example, foam-backed vinyl siding would still require the same maintenance as standard vinyl siding. However, the added insulation layer might reduce the likelihood of expansion and contraction issues caused by temperature changes.
Comparison of Insulated Siding Materials
| Material | Lifespan (Years) | Maintenance Needs | Cost (Relative) |
|---|---|---|---|
| Vinyl (foam-backed) | 20-40 | Periodic cleaning, occasional repairs | Low |
| Fiber Cement (foam-backed) | 50+ | Periodic cleaning, infrequent repairs | Medium-High |
| Wood (foam-backed) | 20-30 (with regular maintenance) | Regular painting/staining, cleaning, repairs | Medium |
| Metal (foam-backed) | 30-50 | Periodic cleaning, occasional repairs | Medium |
Regular Cleaning and Inspection
Maintaining the pristine condition and longevity of your insulated siding requires a proactive approach encompassing regular cleaning and thorough inspections. Neglecting these crucial steps can lead to premature deterioration, compromising both the aesthetic appeal and the protective function of your siding. This section details best practices for cleaning and inspection to ensure your siding remains in optimal condition for years to come.
Cleaning Insulated Siding
Regular cleaning removes dirt, grime, and pollutants that can accumulate on the surface of your siding, preventing staining and potential damage. The frequency of cleaning depends on factors such as climate, environmental conditions, and proximity to trees or other sources of debris. As a general guideline, aim for at least one thorough cleaning per year, with more frequent cleaning in areas prone to heavy soiling.
- Gather your supplies: You will need a garden hose with a nozzle, a soft-bristled brush (avoid harsh brushes that could scratch the surface), a bucket, mild detergent (avoid harsh chemicals), and a ladder (if necessary for reaching higher areas).
- Prepare the cleaning solution: Mix a small amount of mild detergent with water in your bucket. Avoid using strong cleaners, bleach, or abrasive scrubbers, as these can damage the siding’s finish.
- Rinse the siding: Before applying any cleaning solution, thoroughly rinse the entire surface of the siding with the garden hose to remove loose dirt and debris. This prevents scratching during scrubbing.
- Apply the cleaning solution: Dip your brush into the cleaning solution and gently scrub the siding in sections, working from top to bottom. Pay extra attention to areas with significant dirt buildup.
- Rinse thoroughly: Once you have scrubbed the entire surface, rinse the siding thoroughly with the garden hose to remove all traces of the cleaning solution. Ensure all soap residue is gone to prevent streaking.
- Allow to dry: Allow the siding to air dry completely before inspecting for any remaining dirt or damage.
Visual Inspection Guide
Regular visual inspections are critical for early detection of potential problems. These inspections should be conducted at least twice a year – spring and fall – to identify any issues before they escalate into costly repairs.
A visual guide would consist of several images, each showcasing a different siding material and highlighting potential problem areas.
- Image 1: Vinyl Siding – This image would show a close-up of vinyl siding with a caption highlighting common issues such as cracks, warping, discoloration, or loose fasteners. The caption might read: “Inspect vinyl siding for cracks, discoloration (indicating sun damage), and loose or missing fasteners. Warping can be a sign of moisture issues.”
- Image 2: Fiber Cement Siding – This image would show fiber cement siding, focusing on areas where chipping, cracking, or staining might occur. The caption might read: “Fiber cement siding is durable but can chip or crack. Check for signs of water damage, as this can lead to deterioration.”
- Image 3: Aluminum Siding – This image would depict aluminum siding, illustrating potential issues like dents, scratches, or corrosion. The caption might read: “Aluminum siding is resistant to many issues, but dents and scratches can occur. Check for signs of corrosion, especially near the ground.”
Inspecting for Damage
During your inspections, pay close attention to the following:
- Cracks and Gaps: Look for any cracks or gaps in the siding panels, particularly around seams and joints. These can allow moisture to penetrate, leading to rot and damage.
- Loose or Damaged Fasteners: Check all fasteners (nails, screws) to ensure they are securely fastened. Loose fasteners can allow panels to shift or become damaged.
- Water Damage: Look for signs of water damage, such as discoloration, swelling, or rot. Address any water damage promptly to prevent further deterioration.
- Insect Infestation: Inspect for signs of insect infestation, such as holes or tunnels in the siding. If you suspect an infestation, contact a pest control professional.
Addressing Minor Damage and Repairs
Even with proper maintenance, insulated siding can experience minor damage over time. Understanding how to address these issues promptly can prevent further deterioration and maintain the aesthetic appeal and energy efficiency of your home’s exterior. This section details common minor damages and provides guidance on effective repair methods.
Minor damage to insulated siding typically manifests as scratches, dents, small cracks, or loose panels. The severity and repair method will depend on the type of siding material and the extent of the damage. Addressing these issues promptly can prevent larger, more costly repairs down the line.
Types of Minor Damage and Corresponding Repair Methods
Different insulated siding materials react differently to damage. Repair techniques should be tailored accordingly to ensure a lasting and aesthetically pleasing outcome. For example, vinyl siding is relatively easy to repair, while fiber cement might require more specialized tools and techniques.
| Type of Damage | Siding Material | Repair Method |
|---|---|---|
| Scratches | Vinyl | Often, minor scratches can be buffed out with a mild abrasive cleaner and a soft cloth. For deeper scratches, touch-up paint designed for vinyl siding may be necessary. |
| Dents | Vinyl | Small dents in vinyl siding can sometimes be carefully popped back into shape using a heat gun (applied cautiously to avoid melting) and a putty knife. For significant dents, replacement may be necessary. |
| Small Cracks | Fiber Cement | Small cracks in fiber cement siding can be repaired using a high-quality exterior-grade patching compound. The area should be cleaned, the compound applied, and then sanded smooth once dry. A matching paint is then used to finish. |
| Loose Panels | All Types | Loose panels often indicate issues with fasteners. Carefully inspect the area, and if the panel is not damaged, re-secure it using appropriate fasteners, such as screws or nails. Ensure the fasteners are properly sealed to prevent water ingress. |
Tools and Materials Checklist for Common Siding Repairs
Having the right tools and materials on hand will streamline the repair process and ensure a quality outcome. This checklist covers common items needed for addressing minor siding damage. Always refer to the manufacturer’s instructions for your specific siding material.
- Putty knife
- Soft cloths
- Mild abrasive cleaner
- Exterior-grade patching compound
- Sandpaper (various grits)
- Touch-up paint (matching siding color)
- Screws or nails (appropriate size and type)
- Caulk or sealant
- Heat gun (for vinyl siding, use with extreme caution)
- Safety glasses and gloves
Preventing Moisture Damage
Insulated siding, while offering excellent protection from the elements, is vulnerable to moisture damage if not properly maintained. Prolonged exposure to water can lead to rot, mold growth, and a significant reduction in the siding’s lifespan and energy efficiency. Preventing moisture damage is crucial for preserving the integrity and longevity of your home’s exterior. This involves a multifaceted approach focusing on proper ventilation, drainage, and sealing potential entry points for water.
Proper ventilation and drainage are essential for preventing moisture buildup around your house. Standing water near the foundation creates an ideal environment for moisture to seep into the siding and cause damage. Effective drainage channels water away from the house, preventing saturation of the soil and reducing the risk of water intrusion. Adequate ventilation allows for air circulation, reducing humidity levels and preventing the condensation that can lead to moisture problems.
Ventilation and Drainage Strategies
Effective drainage systems are paramount. This includes ensuring gutters and downspouts are clean and functioning correctly, directing water at least 6 feet away from the foundation. Consider installing extensions to downspouts to further extend the drainage distance. Grading the soil around your foundation to slope away from the house also helps prevent water accumulation. For improved ventilation, ensure there are sufficient gaps between the siding and the underlying structure, allowing air to circulate and dry any trapped moisture. Properly functioning soffit vents and ridge vents in the roof contribute to overall home ventilation, reducing humidity and minimizing moisture issues near the siding. Regularly inspect these areas for blockages like leaves or debris.
Identifying and Addressing Water Accumulation
Identifying areas where water might accumulate is a crucial first step in preventing moisture damage. Look for signs of water staining on the siding, particularly around windows, doors, and other potential entry points. Check the foundation for cracks or gaps that could allow water to seep into the walls. Pay close attention to areas where the ground slopes towards the house, as this can lead to water pooling against the foundation. Inspect the gutters and downspouts for any clogs or damage that could impede proper drainage. If you notice standing water near the foundation, consider improving the grading of the soil to direct water away from the house. Addressing these areas promptly can prevent significant damage in the long run.
Preventing Moisture Intrusion
Sealing gaps and cracks in the siding is a crucial step in preventing moisture intrusion. Use a high-quality, weather-resistant sealant to fill any gaps or cracks around windows, doors, and other openings. Inspect the caulking around these areas regularly and replace it as needed. Also, examine the joints between siding panels for any gaps or cracks. Use appropriate sealant to fill these gaps, ensuring a tight seal to prevent water penetration. Regular inspection and prompt sealing of any openings are essential for maintaining the water-resistant barrier provided by the insulated siding. Consider using backer rod to fill larger gaps before applying sealant for a more effective and durable seal.
Seasonal Maintenance
Insulated siding, while durable, requires seasonal attention to ensure its longevity and effectiveness. A proactive maintenance schedule will prevent minor issues from escalating into costly repairs and maintain your home’s curb appeal. Regular inspections and targeted cleaning throughout the year are key to protecting your investment.
A well-structured seasonal maintenance plan considers the unique challenges each season presents. This approach allows for preventative measures, minimizing the risk of damage and ensuring your siding remains in optimal condition.
Spring Maintenance
Spring cleaning focuses on removing the accumulation of winter debris and assessing any potential damage incurred during the colder months. This is a crucial step in preparing your siding for the warmer months ahead.
The following tasks should be undertaken during the spring:
- Thoroughly inspect the siding for any signs of damage, such as cracks, loose panels, or areas where caulking has failed. Pay particular attention to areas exposed to harsh winter elements.
- Clean the siding using a gentle detergent and a soft-bristled brush. Rinse thoroughly with water to remove all traces of dirt and grime. Avoid using high-pressure washers, as these can damage the siding’s surface.
- Inspect and repair any damaged caulking around windows and doors. Apply fresh caulking as needed to prevent moisture intrusion.
- Check for any signs of pest infestation, such as insect holes or woodpecker damage. Address any infestations promptly to prevent further damage.
Summer Maintenance
Summer’s intense heat and sunlight can cause expansion and stress on siding materials. Regular inspections and preventative measures are important to maintain the integrity of your siding.
Summer maintenance tasks include:
- Regularly inspect the siding for any signs of fading, discoloration, or warping. Prolonged sun exposure can affect the color and structural integrity of the siding.
- Keep vegetation trimmed away from the siding to prevent moisture buildup and pest infestations. Maintaining adequate clearance promotes good air circulation.
- Monitor for any signs of loose or damaged fasteners. Tighten or replace any loose screws or nails to maintain the structural integrity of the siding.
- In extremely hot climates, consider applying a high-quality siding sealant to help protect the siding from UV damage and prevent fading.
Autumn Maintenance
Autumn brings falling leaves and other debris that can accumulate on the siding, potentially trapping moisture and leading to damage. Cleaning and inspection are crucial at this time of year.
Fall maintenance should include:
- Remove all accumulated leaves, twigs, and other debris from the siding. Use a soft-bristled brush or a leaf blower to gently remove debris without damaging the siding’s surface.
- Inspect gutters and downspouts to ensure they are clean and free of obstructions. Properly functioning gutters prevent water from accumulating against the siding.
- Check for any signs of damage caused by falling branches or other debris. Repair any damage promptly to prevent further deterioration.
- Inspect the caulking around windows and doors, and reapply as needed to prevent water damage during the upcoming winter months.
Winter Maintenance
Winter’s harsh conditions, including ice, snow, and freezing temperatures, can pose significant challenges to insulated siding. Regular inspections and preventative measures are vital during this season.
Winter maintenance focuses on mitigating the impact of harsh weather conditions:
- Regularly inspect the siding for any signs of ice damage, such as cracks or warping. Ice buildup can exert significant pressure on the siding, leading to damage.
- Clear snow and ice from the siding carefully to prevent damage. Avoid using sharp tools or excessive force that could scratch or puncture the siding.
- Ensure gutters and downspouts are clear of ice and snow to prevent water damage. Ice dams can cause significant damage to the roof and siding.
- Monitor for any signs of moisture intrusion, such as water stains or mold growth. Address any moisture issues promptly to prevent further damage.
Long-Term Care and Replacement
Insulated siding, while durable, eventually requires significant maintenance or replacement. Understanding the signs of deterioration and the process of choosing a qualified contractor are crucial for preserving your home’s exterior and value. Proactive maintenance significantly extends the lifespan of your siding, saving you money and hassle in the long run.
Recognizing when your insulated siding needs attention is vital. While regular cleaning and minor repairs address superficial issues, certain signs point to more extensive problems requiring professional intervention. These signs often indicate a need for major repairs or even complete replacement.
Signs Indicating the Need for Siding Replacement or Major Repairs
Several visual and functional indicators signal that your insulated siding may require significant attention. Ignoring these can lead to further damage and costly repairs down the line. Careful observation is key to early detection.
- Extensive cracking or warping of siding panels, particularly across multiple panels, suggests underlying structural issues or severe weather damage. This is often accompanied by noticeable gaps or separations between panels.
- Significant discoloration or fading that is not easily addressed with cleaning indicates sun damage or the breakdown of the siding’s protective layers. This can lead to reduced insulation efficiency and potential moisture penetration.
- Persistent moisture intrusion, evidenced by water stains, mold growth, or rotting wood underneath the siding, is a critical warning sign requiring immediate professional attention. This indicates a failure in the siding’s weatherproofing capabilities.
- Loose or detached siding panels, particularly those showing signs of impact damage, are safety hazards and can compromise the home’s insulation and weather protection. Immediate repair or replacement is necessary.
- Extensive pest infestation, particularly wood-boring insects, can weaken the structural integrity of the siding and underlying framework. Professional inspection and treatment are crucial before any repairs or replacements.
Choosing a Reputable Contractor for Siding Repairs or Replacement
Selecting a qualified and reputable contractor is essential for successful siding repairs or replacement. A poorly executed job can lead to further damage, wasted money, and compromised home protection. Thorough research and due diligence are vital steps in this process.
- Verify licensing and insurance: Ensure the contractor holds the necessary licenses and insurance to perform the work legally and protect you from liability in case of accidents or damages.
- Check references and reviews: Contact previous clients to inquire about their experiences with the contractor’s work quality, timeliness, and professionalism. Online reviews can also provide valuable insights.
- Obtain detailed estimates: Compare written estimates from multiple contractors, ensuring they include all materials, labor costs, and a clear timeline for completion. Be wary of unusually low bids.
- Clarify warranties and guarantees: Understand the warranty offered on materials and workmanship to protect your investment against potential defects or failures.
- Confirm proper disposal of old siding: Ensure the contractor has a plan for environmentally responsible disposal of old siding materials in accordance with local regulations.
Tips for Extending the Lifespan of Insulated Siding
Regular maintenance significantly contributes to the longevity of your insulated siding. By following these preventative measures, you can minimize the need for costly repairs and extend the life of your siding investment.
- Regular cleaning: Clean your siding at least once or twice a year to remove dirt, debris, and algae growth. This prevents buildup that can damage the siding and compromise its aesthetic appeal.
- Promptly address minor damage: Repair minor dents, scratches, or loose panels immediately to prevent further damage from moisture or pests. Ignoring small issues can lead to bigger, more expensive problems.
- Regular inspection: Conduct thorough inspections twice a year, looking for signs of damage, deterioration, or pest infestation. Early detection allows for timely intervention and minimizes repair costs.
- Maintain proper ventilation: Ensure adequate ventilation around your home to prevent moisture buildup, which can lead to rot and damage to the siding and underlying structure.
- Protect against impact damage: Take steps to protect your siding from potential impact damage, such as trimming overhanging branches and keeping the area around your home clear of debris.
Last Point
By following the advice outlined in this guide, you can significantly extend the life of your insulated siding. Regular cleaning, prompt attention to minor damage, and preventative measures against moisture are key to preserving its beauty and functionality. Remember, proactive maintenance is far more cost-effective than extensive repairs or premature replacement. With a little care and attention, your insulated siding will continue to protect and enhance your home for many years.
Read more:
- Benefits Of Insulated Siding A Comprehensive Guide
- Best Siding For Cold Climates
- Durable Insulated Siding Options
- Green Insulated Siding Options
- How To Maintain Insulated Siding
- Insulated Siding For Better Insulation
- Insulated Siding For Noise Reduction
- Insulated Siding Repair Tips
- Is Insulated Siding Worth It
- Weather Resistant Insulated Siding A Comprehensive Guide
