Wood Insulated Siding: A Comprehensive Guide
- Supra Home Student
- 2025 February 09T13:37
- Home Insulated
Wood insulated siding offers a compelling blend of aesthetics and energy efficiency. This innovative building material combines the natural beauty of wood with the insulating properties of a core material, resulting in a visually appealing and thermally efficient exterior cladding. We’ll explore its composition, installation, maintenance, cost-effectiveness, and design applications, providing a comprehensive overview of this increasingly popular siding choice.
From understanding the various types of wood and insulation cores used in its construction to mastering the intricacies of installation and long-term maintenance, this guide will equip you with the knowledge to make informed decisions about incorporating wood insulated siding into your next project. We’ll also delve into the financial and environmental aspects, comparing it to other siding materials and analyzing its long-term value proposition.
Wood Insulated Siding
Wood insulated siding offers a compelling blend of aesthetic appeal and energy efficiency, making it a popular choice for homeowners seeking both beauty and functionality. This material combines the natural look of wood with the insulating properties of a core material, resulting in a superior exterior cladding system compared to traditional wood siding alone.
Material Composition and Properties
Wood insulated siding typically consists of three main components: an outer layer of wood, an insulating core, and an inner facing layer. The outer wood layer, often made from cedar, redwood, or other durable species, provides the visual appeal and weather protection. The core material is usually expanded polystyrene (EPS), polyurethane foam, or polyisocyanurate (polyiso), offering excellent thermal resistance. Finally, a facing layer, often a moisture-resistant material such as polyethylene film or a treated plywood, protects the insulation core from moisture intrusion. The specific materials and thicknesses will vary depending on the manufacturer and the desired performance characteristics.
Thermal Performance Compared to Other Siding Materials
Wood insulated siding demonstrates significantly improved thermal performance compared to traditional vinyl or fiber cement siding. Its insulation core effectively reduces heat transfer, leading to lower energy consumption for heating and cooling. While precise R-values vary depending on the thickness of the insulation core, wood insulated siding typically boasts R-values considerably higher than those of vinyl or fiber cement, contributing to a more energy-efficient home. For example, a typical wood insulated siding panel might have an R-value of R-8 or higher, whereas vinyl siding has an R-value near zero. Fiber cement siding offers slightly better insulation than vinyl, but still lags behind wood insulated siding.
Moisture Resistance and Susceptibility to Degradation
While the insulated core provides a degree of protection, the wood exterior of insulated siding remains susceptible to moisture damage. Proper installation and regular maintenance are crucial to prevent rot, decay, and insect infestation. The outer wood layer should be treated with a high-quality water-repellent sealant to minimize moisture absorption. Additionally, ensuring proper ventilation behind the siding is essential to allow for the escape of any trapped moisture. Compared to solid wood siding, however, the insulated core can help mitigate some of the moisture-related issues by slowing down the rate of moisture penetration. Careful selection of wood species known for their natural decay resistance, such as cedar or redwood, further enhances the siding’s longevity.
Manufacturing Process and Joining Methods
The manufacturing process involves bonding the wood exterior, insulation core, and facing layer under pressure. Precise methods vary among manufacturers, but generally involve applying adhesive to the core and then pressing the wood and facing layers onto it. The entire assembly is then cured to ensure a strong and durable bond. Joining methods for installation typically involve overlapping panels and using fasteners to secure them to the house’s framing. Manufacturers often provide specific instructions for proper installation to ensure a watertight seal and prevent potential problems. Sealants are typically used at joints and around penetrations to further enhance moisture resistance.
Installation Methods and Techniques
Installing wood insulated siding offers a blend of aesthetic appeal and energy efficiency. Proper installation is crucial for maximizing its benefits and ensuring longevity. This section details the process, emphasizing key techniques for a successful project.
Step-by-Step Installation Guide
The installation of wood insulated siding involves several key steps, from careful preparation to meticulous finishing. Following these steps ensures a durable and aesthetically pleasing outcome.
| Step Number | Description | Tools Required | Image Description |
|---|---|---|---|
| 1 | Prepare the wall surface. This includes removing old siding, repairing any damage to the sheathing, and ensuring the surface is clean and dry. | Hammer, pry bar, scraper, wood filler, sandpaper | A photograph showing a clean, prepared wall surface, free of debris and with any necessary repairs completed. The wall is ready for the installation of the first piece of siding. |
| 2 | Install starter strips along the bottom of the wall, ensuring they are level and plumb. These provide a consistent base for the siding. | Level, plumb bob, measuring tape, nails or screws, hammer or drill | An image depicting the installation of starter strips, highlighting the use of a level to ensure proper alignment. The strips are neatly fastened to the wall. |
| 3 | Install the first course of siding, ensuring proper overlap and alignment with the starter strip. Secure with appropriate fasteners. | Wood insulated siding panels, nails or screws, hammer or drill, nail gun (optional) | A picture showing the first row of siding panels neatly installed and aligned, with fasteners securely in place. The overlap between panels is clearly visible. |
| 4 | Continue installing subsequent courses, maintaining consistent overlap and alignment. Use a level and measuring tape to check for plumb and square throughout the installation. | Wood insulated siding panels, nails or screws, hammer or drill, level, measuring tape | An image depicting multiple rows of siding installed, showcasing the consistent overlap and alignment of the panels. The installer is using a level to ensure accuracy. |
| 5 | Install corner and trim pieces, following manufacturer’s instructions. Ensure proper alignment and secure fastening. | Corner and trim pieces, nails or screws, hammer or drill, miter saw (for cutting trim) | A close-up photograph illustrating the precise installation of corner and trim pieces, showing clean cuts and secure fastening. The transition between siding and trim is seamless. |
| 6 | Caulk all seams and joints to prevent water infiltration. | Caulk gun, exterior-grade caulk | An image showcasing the application of caulk to all seams and joints, ensuring a watertight seal. The caulk is neatly applied and smooth. |
Fastening Methods
The choice of fastening method depends on climate and building type. In colder climates, expansion and contraction of the siding must be accounted for. Using corrosion-resistant fasteners is crucial in all climates. Examples include stainless steel or galvanized nails and screws. For instance, in coastal areas, stainless steel fasteners are preferred due to their resistance to salt corrosion. In areas with high wind loads, longer and more robust fasteners may be necessary to ensure secure attachment.
Flashing and Sealing
Proper flashing and sealing are essential to prevent water damage. Flashing should be installed at all vulnerable areas, such as around windows, doors, and corners. High-quality sealant should be used to seal all joints and gaps, creating a continuous barrier against moisture. Failure to properly flash and seal can lead to significant water damage and costly repairs. For example, neglecting flashing around a window can lead to water seeping behind the siding and causing rot in the underlying framing.
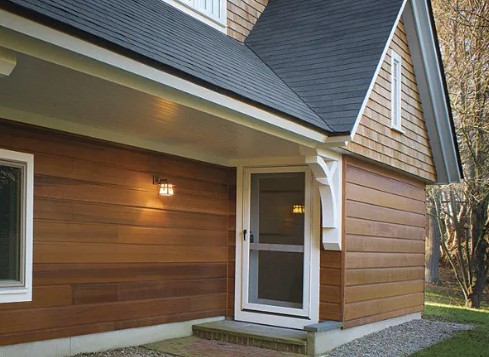
Installation Around Windows and Doors
A visual representation would show a detailed close-up of the installation around a window. The image would depict a precisely cut piece of wood insulated siding fitting snugly around the window frame. A layer of flashing would be visible, meticulously installed beneath the siding to divert water away from the window. The gap between the siding and the window frame would be completely sealed with a high-quality, weather-resistant caulk. The same meticulous attention to detail would be visible in the siding’s installation around the door. The image would highlight the use of trim pieces for a neat and professional finish. The overall impression would be one of precision and careful craftsmanship, ensuring a watertight and aesthetically pleasing installation.
Maintenance and Durability
Wood insulated siding, while offering numerous benefits, requires proper maintenance to ensure its longevity and aesthetic appeal. Understanding the best practices for cleaning, addressing common problems, and estimating lifespan under varying conditions are crucial for maximizing the investment in this type of siding. Regular care will significantly extend the life of your siding and protect it from premature deterioration.
Cleaning and Maintenance Best Practices
Maintaining the pristine appearance and structural integrity of wood insulated siding involves a straightforward yet consistent approach. Regular cleaning removes dirt, debris, and mildew, preventing damage and preserving the natural beauty of the wood. This process also helps to identify potential problems early on, allowing for timely intervention and preventing minor issues from escalating into costly repairs.
- Annual Cleaning: A thorough cleaning should be performed annually, ideally in spring or fall, depending on your climate. Use a soft-bristled brush and a solution of mild detergent and water. Avoid high-pressure washing, which can damage the siding.
- Mildew and Mold Prevention: In humid climates, mildew and mold can be a concern. A solution of bleach and water (following manufacturer’s instructions carefully) can be used to treat affected areas. Always rinse thoroughly after application.
- Stain and Sealant Application: Applying a high-quality wood stain and sealant every 2-3 years helps protect the wood from moisture damage, UV degradation, and insect infestation. Choose a product specifically designed for exterior use and follow the manufacturer’s instructions carefully.
- Regular Inspection: Regularly inspect the siding for any signs of damage, such as warping, cracking, or insect infestation. Addressing these issues promptly prevents further damage and saves on costly repairs down the line.
Common Problems and Prevention
Several issues can affect the longevity of wood insulated siding, but many are preventable with proper care and maintenance. Understanding these potential problems and implementing preventative measures will significantly extend the life of your siding.
- Warping: Warping occurs when the wood absorbs excessive moisture. Proper sealing and regular maintenance are key to preventing this. Ensure proper ventilation around the siding to allow for moisture evaporation.
- Cracking: Cracking can be caused by temperature fluctuations, poor installation, or impact damage. Careful installation, using appropriate fasteners, and regular inspections can help prevent cracking.
- Fading: Exposure to UV radiation from the sun can cause the wood to fade over time. Using a high-quality UV-resistant stain can significantly reduce fading and maintain the color of the siding.
- Insect Infestation: Wood is susceptible to insect infestation. Regular inspections and the use of insect repellent treatments can help prevent this problem.
Expected Lifespan
The lifespan of wood insulated siding varies considerably depending on environmental factors, maintenance practices, and the quality of the materials used. In ideal conditions with regular maintenance, it can last for 30-50 years or even longer. However, in harsh climates with significant exposure to moisture, sun, and extreme temperature fluctuations, the lifespan may be shorter, potentially reducing to 20-30 years. For example, coastal areas with high salinity and frequent storms may require more frequent maintenance and could see a shorter lifespan compared to a dry, inland climate. Proper maintenance, such as regular cleaning and re-staining, significantly extends the lifespan regardless of the environment.
Cost and Sustainability Considerations
Choosing the right siding material involves a careful balancing act between initial investment, long-term costs, and environmental impact. Wood insulated siding presents a compelling option, but a thorough understanding of its cost and sustainability aspects is crucial for informed decision-making. This section will explore the financial and environmental implications of this siding choice, enabling you to make a well-reasoned selection for your project.
Comparative Costs of Siding Materials
The initial cost of siding varies significantly depending on the material selected. Wood insulated siding typically falls within a specific price range, but it’s essential to compare it to other popular options to gauge its relative cost-effectiveness.
| Siding Material | Cost per Square Foot (Range) |
|---|---|
| Wood Insulated Siding | $8 – $20 |
| Vinyl Siding | $3 – $10 |
| Fiber Cement Siding | $6 – $15 |
| Aluminum Siding | $4 – $8 |
| Brick | $10 – $30+ |
Note: These cost ranges are estimates and can vary based on factors such as material quality, labor costs, and regional differences. It’s always recommended to obtain multiple quotes from reputable contractors for accurate pricing.
Long-Term Cost-Effectiveness of Wood Insulated Siding
While the initial cost of wood insulated siding might be higher than some alternatives like vinyl, its long-term cost-effectiveness stems from several factors. Significant energy savings are achieved due to the insulation layer built into the siding itself, reducing heating and cooling costs over the lifetime of the structure. Moreover, properly maintained wood insulated siding boasts remarkable durability, minimizing the need for frequent repairs and replacements compared to other siding types. The overall lower maintenance translates to reduced long-term expenses.
Environmental Impact of Wood Insulated Siding
The environmental footprint of wood insulated siding depends heavily on the sourcing and manufacturing processes. Siding sourced from sustainably managed forests minimizes the environmental impact, reducing deforestation and carbon emissions. The use of wood, a renewable resource, offers a more sustainable alternative compared to materials derived from non-renewable sources. However, the manufacturing process, including transportation and potential use of chemicals, should also be considered. Choosing products certified by organizations like the Forest Stewardship Council (FSC) can ensure responsible sourcing and minimize the environmental impact.
Return on Investment (ROI) Calculation for Wood Insulated Siding
Calculating the ROI for wood insulated siding requires considering several factors. The initial cost of installation, energy savings, and maintenance costs over a set period (e.g., 10-20 years) must be factored into the equation. For example, consider a home with 1000 square feet of siding. If wood insulated siding costs $15/sq ft and reduces annual energy costs by $500, the total initial investment is $15,000. Over 10 years, the energy savings would be $5,000. Assuming minimal maintenance costs, the ROI would be approximately 33% ($5,000/$15,000). This is a simplified calculation; a comprehensive analysis should incorporate a more detailed cost breakdown and potential resale value increases due to improved energy efficiency.
ROI = (Total Savings – Total Investment) / Total Investment
Aesthetic Considerations and Design Applications
Wood insulated siding offers a compelling blend of performance and aesthetics, allowing homeowners to enhance their property’s curb appeal while enjoying superior energy efficiency. The versatility of wood, combined with the insulating properties, opens up a wide range of design possibilities, catering to diverse architectural styles and personal preferences. Careful consideration of color, texture, and style can significantly impact the overall look and feel of a home.
The choice of wood insulated siding significantly impacts a home’s aesthetic appeal. The natural beauty of wood provides a warmth and character unmatched by many other siding materials. However, the selection process involves considering various factors, including the style, finish, and color to ensure a harmonious blend with the overall architectural design and personal preferences.
Available Styles and Finishes of Wood Insulated Siding
Numerous styles and finishes are available for wood insulated siding, offering diverse options to complement various architectural designs. These choices allow homeowners to personalize their homes’ exterior, creating a unique and visually appealing façade.
- Shiplap: Characterized by overlapping horizontal boards, shiplap siding creates a classic, rustic look, often seen in farmhouse and coastal styles.
- Board and Batten: This style features wider vertical boards with narrower strips (battens) covering the seams, offering a clean, traditional appearance suitable for various architectural styles.
- Vertical Siding: Vertical wood siding provides a modern and sleek aesthetic, often used in contemporary and minimalist designs. It can also create an illusion of height.
- Shake Siding: Recreating the look of natural wood shakes, this style offers a rustic and textured finish, well-suited for homes with a craftsman or mountain style.
- Various Finishes: Beyond style, finishes such as stained, painted, or clear-coated options influence the final appearance. Staining emphasizes the wood grain, while painting allows for a wide range of colors. Clear coats protect the wood while retaining its natural beauty.
Wood Insulated Siding and Architectural Styles
The adaptability of wood insulated siding makes it suitable for a broad spectrum of architectural styles. The choice of style, color, and finish plays a crucial role in achieving a cohesive and aesthetically pleasing result. Careful planning ensures that the siding enhances, rather than detracts from, the home’s overall design.
For instance, a farmhouse style home might benefit from shiplap siding in a warm, earthy tone. A contemporary home could be enhanced with sleek vertical siding in a modern gray or white. A craftsman-style home could utilize shake siding to accentuate its rustic charm. The possibilities are vast and depend on the specific architectural features and desired aesthetic.
Visual Representation of Design Applications
Imagine a series of images. The first depicts a charming two-story farmhouse, clad in warm brown shiplap siding, accented with white trim around the windows and doors. A second image showcases a sleek, modern home with clean lines, featuring vertical gray siding and large windows. The third image displays a rustic cabin nestled in a mountainous area, its exterior wrapped in textured, dark brown shake siding that blends seamlessly with the natural surroundings. A fourth image presents a coastal home with white painted board and batten siding, evoking a sense of breezy elegance. Each image highlights how the choice of wood insulated siding complements the unique architectural style and environment of the home.
Impact of Color and Texture on Curb Appeal
The color and texture of wood insulated siding are paramount in determining a home’s curb appeal. Warm, earthy tones like browns and tans create a sense of rustic charm and often complement natural landscapes. Cooler colors such as grays and blues can lend a modern and sophisticated feel. The texture of the siding, whether smooth or rough, also plays a significant role. Rough textures, like those found in shake siding, add visual interest and a sense of warmth, while smoother textures contribute to a more refined and contemporary look. Ultimately, the successful integration of color and texture enhances the overall visual appeal and creates a lasting impression.
Closure
Wood insulated siding presents a strong case for homeowners and builders seeking a durable, energy-efficient, and aesthetically pleasing exterior solution. Its inherent insulating capabilities contribute to lower energy bills, while its natural beauty enhances curb appeal. By understanding the material properties, installation techniques, and maintenance requirements, you can confidently utilize wood insulated siding to create a beautiful and sustainable home. The initial investment, while potentially higher than some alternatives, is often offset by long-term energy savings and reduced maintenance costs, making it a worthwhile consideration for those seeking a premium exterior finish.
Read more:
- Best Insulated Siding For Energy Savings
- Energy Efficient Insulated Siding A Comprehensive Guide
- Fiber Cement Insulated Siding A Comprehensive Guide
- How To Install Insulated Siding
- Insulated Siding Installation Cost
- Vinyl Insulated Siding A Comprehensive Guide
- Wood Insulated Siding A Comprehensive Guide
